You create a "share point" to specify the data that users can access when they connect to the Web & File Server. You can make an entire hard disk, CD-ROM disc, or individual folder a share point. The items contained in a share point are also shared by default.
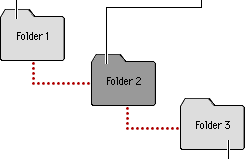
Note: You cannot make a share point out of an item that encloses a share point or is enclosed by a share point. For example, you cannot make a folder a share point if the folder is on a hard disk that is a share point. This restriction is demonstrated by the following illustration.
| Folder 1 is not a share point. You cannot make it a share point until you remove sharing from Folder 2. | Folder 2 is a share point. All of the folders enclosed by Folder 2 are shared. | |
 |
||
| Folder 3 is shared because Folder 2 is a share point. But you cannot make Folder 3 a share point until you remove sharing from Folder 2. | ||
To share a disk, CD-ROM disc, or folder, follow these steps: Click the File server button.
1
Log on to AppleShare IP Remote Admin.
2

3
Click the Disks & Share Points button.
4
In the Show Disks list, click the disk, CD-ROM disc, or folder
that you want to make a share point.
To display an item's contents, click the item.
5
To set privileges for the selected item, click Set Privileges.
Note: By default, all items contained in a share point are also shared.
However, you can set different access privileges for a folder
inside a share point, by assigning explicit access privileges
to the folder. See Setting access privileges.
6
In the Set Privileges area, click the button labeled "Make this
a share point and set privileges."
7
Select the access privileges that you want to assign to this share
point by choosing a privilege from the pop-up menu to the right
of the Owner, User/Group, or Everyone category.
These privileges determine how different categories of users can
access the information contained in this share point. For more
information, see Setting access privileges.
8
Click the Save button.
The selected item appears as a volume when users log on to the
Web & File Server using AppleShare Client or Windows file sharing
client software.
Table of contents